
Who doesn’t love a little red wagon. I know my fur babies do. So I made a little red wagon out of card stock and parts. I also made a pink and blue one and called them baby flyers. Longest tutorial for me…so hopefully no missing information.
Supplies:
- Card Stock in your color choice for body and black for the axles
- white glue
- tumb tacks white
- o rings ( I bought two assortments at Home depot)
- coffee stirrer
- eyelets
- grommets and snap fasteners parts (see pictures in tutorial)
- paint to match your card stock and white for logo
- sand paper
- mini dowels
- paper trimmer
- 1/4 inch hole punch and 1/8″
- Sew on Snap approx 1/4″
- Spackling
- Brads
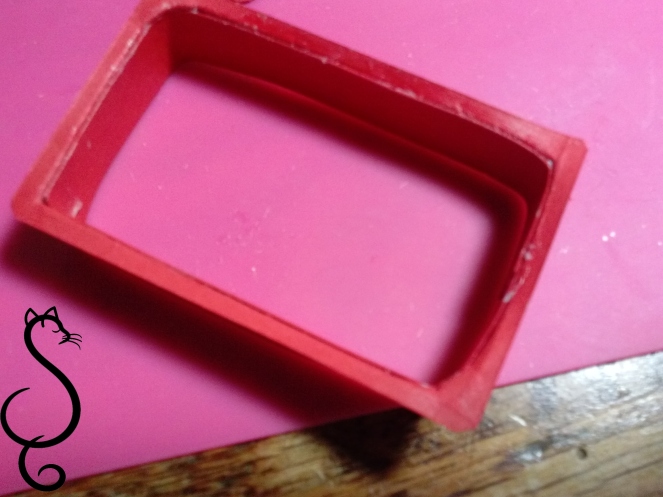
We will start on the body of the wagon you will need to cut the following out of your card stock.

- 2 pcs 12″x 1/2 Side Walls
- 1 pc 3 3/4 x 2 3/4 Upper rim
- 4 pcs 2 1/2 3/1/2 Bottom of wagon
Round the corners on the upper rim and bottom. Form one piece of the side wall around the bottom.
Measure from the short side of the bottom in 1/2″ and from the long side 3/4″ and mark. Glue this bottom and two other together like a stack of cards. Be sure the the marked one is visable. Let dry. Center and hole punch through all three cards. This will be the recess area for one half of your snap. The snap allows the handle/ front axle to pivot.
Card stock is usually made of two pieces of paper laminated. So on your wagon sides the over lap you can help eliminate some of the bulk by splitting the paper and removing half on each over lap. Just remember to take off opposites. Top half on one side and bottom half on the other. That way when you glue the ends together they butt up and join with out having added bulk. My pictures were blurry…so I the samples below are in brown card stock just for reference.


Use one of the bottoms to trace out a line on the upper rim.

Then mark another approximately 1/4 inch to the inside and cut out the center. Once you have the center cut out, make small clip towards the first marking. 
Glue your side wall together. Bend the clip tabs down a little on the upper rim and glue the tabs to the inside of the sides. 
Dry fit your second 1/2″ by 12″ side to the inside to cover up the folded down tabs. Trim and glue as you did the first sides. Take a ball stylus and round out the rim.


Glue you final bottom to the 3 stack with the hole. Dry. Fit the bottoms into your sides. You may have to trim a little to fit. Once you have you fit…glue in place.
Add a little of the paint to the spackling and fill the gaps. Dry. Sand.
Paint a coat of the color and dry.


Now on the the bottom.

Cut some strips of black card stock 1/4″ wide.
This is the part that the front axle goes through.
 Follow the folds and add the eyelets as in the picture.
Here is what you should end up with. Build two of these.

Glue centered and 1/4″ from the edge. Ignore the pictures…I had to move them closer to the edge.

The above has both of the axles supports. Cut out the one on the left out of black card stock.
Fold as shown in the below picture and glue on one of the axle supports.

Glue the other half of the snap into the hole.

Sorry a little messy picture. But just clean off the excess glue.
Now onto the wheels.


Two of the parts are from Dritz..they are sewing supplies.
Assemble your wheels.

O ring glued to the fastener. Then the snap fastener creates the beauty rim.
The eyelet goes into the back like the picture above. We will add the thumb tack after the wheels are on the axels.
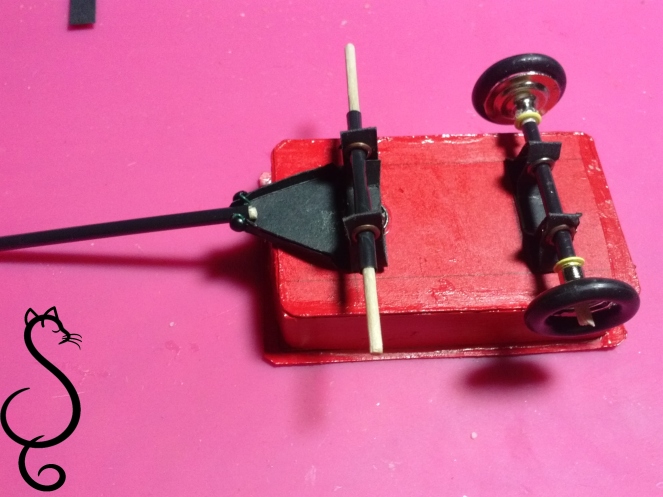
Use the coffee stirrer straws to go through the axle supports and trim. Then add the mini dowels and trim. Then glue on your wheels to the mini dowel. Be sure to have them even.

For the wagon handle. Use a coffee stirrer with a mini dowel inside. I drilled some small hole on two side of the handle and used the tiny brads to attach to the axel support.


Cut a small 1/8″ wide strip of black card stock and bend around a stir stick to shape the handle

Glue into the handle.

Now for the finishing touches. To add the logo on the sides, I did the pencil transfer technique for guidence for painting. Print out the logo. Hold up to a window and trace with pencil. Then place the tracing side against the side of the wagon and rub. The pencil tracing will rub off onto the wagon. Then you can paint your logo on both sides of the wagon. 

I found the logo by searching for the radio flyer decals.
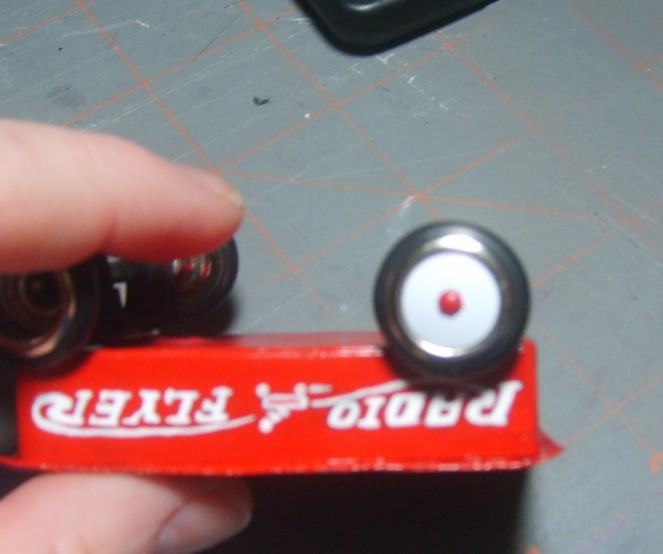
Punch and round 4 pcs 1/8 circle from red card stock and round out with a stylus. Cut the tips off of 4 white thumb tacks. Glue the white thumb tacks as wheel covers and the little red rounded card stock in the center of the white thumb tacks.
Ta da….Little Red Wagon.


A good web site for miniatures made out of card stock and matt board is http://1inchminisbykris.blogspot.com Truly a find.


Thanks for thiss
LikeLike
Welcome!
LikeLike