
Ok friends…onward we go. Print out the 8.5 by 11 sheet below. Make sure that the one inch square does measure one inch. I find that if I have outlines of the cuts I need, it helps with the cutting. Still learning how to cut wood consistently the correct size. Measure twice cut once seems to be a stumbling block for me. I printed mine on sticker or label paper so I could place directly on the wood to cut.

As I am working I use an craft knife to cut out my outlines and place them onto the wood and then cut to size.
Start with the base posts/legs cut out of square dowels.

Cut out the remainder of the outlines on skinny sticks and tongue depressors.

The wood tongue depressors I used a box cutter to score the cuts.
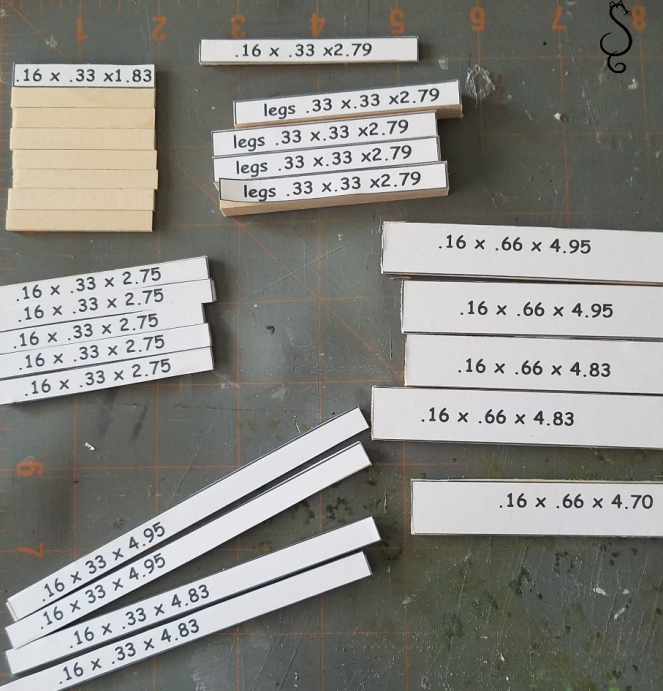
Sand all the rough edges and remove the sticker labels. Be sure to mark the size or piece in pencil to keep track.
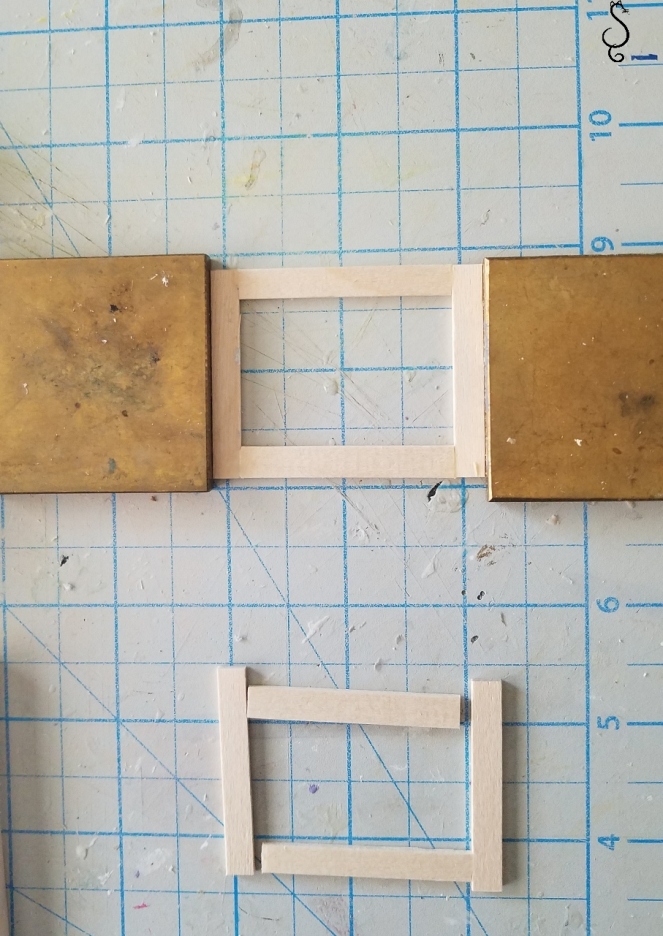
16 x .66 x 4.83 and .16 x .66 x 4.95 two pieces each will form the top surround frame of the chicken coop. Glue into a square like the picture below. With the shorter pcs being butted and glued inside the longer pieces.

Do the same to the for the 16 x .33 x 4.83 and .16 x .33 x 4.95 two pieces each to form the lower surround frame of the chicken coop.

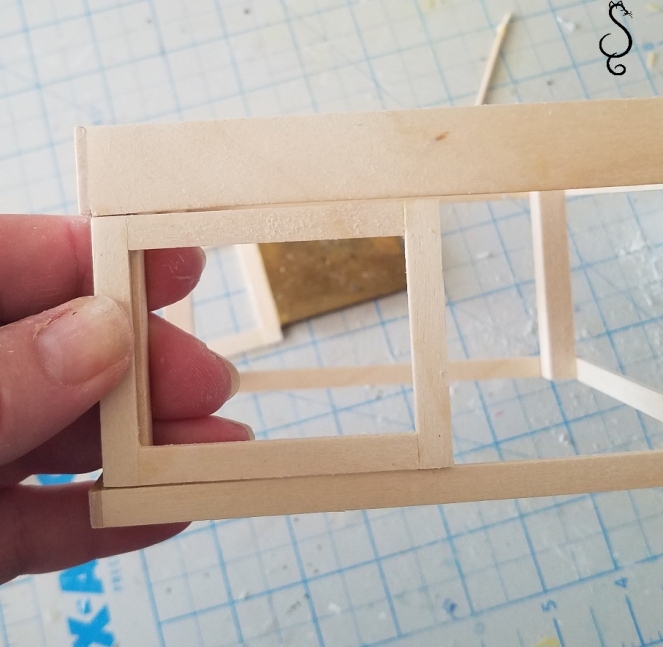
Glue the posts/legs into the corners of the square.

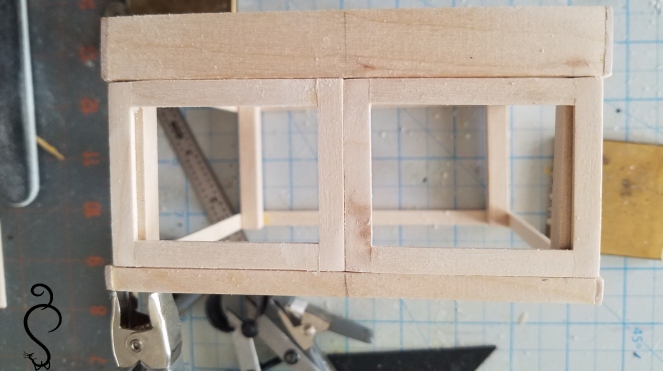
Once dry…turn over and glue into the other square frame of supports. Let dry and sand as needed. Use a piece of the 16 x .33 x 1.88 to space the upper frame and bottom frame evenly on the posts.
Your square should measure 5″ by 5″ around.
Mark on one side the middle point. You can cheat and cut a strip of paper the same length and then fold in half to find the middle.


Glue in the 16 x .33 x 2.79 piece inside the squares in the middle. This is the stop for the doors to the chicken coop yard.
Using the .16 x .33 x 1.88 pieces form the frames for the doors and test fit.
You may have to do a little of sanding to fit the frames. They should meet in the middle and just end with the edge of the posts/legs.
Glue the two 16 x .66 x 4.70 pieces together and clamp to dry. Mark the middle of the opposite side of the door frame stop.

Glue this piece across from the door frame support to the middle of the opposite side.

We will take a break here and continue next week with adding some faux chicken wire.
Thanks for following along.
So let’s add some more details to the base.
Add some supports for the floors of the garden bedding and the coop.
Facing the base left side, add some trim pieces just around the upper edge and glue in just below the edge. Just enough room for the floor slats to sit flush with the edge.

On the right side facing, add supports to rest just above the bottom of the edge so that the floor slats will rest just above the bottom of the facing.

cut slats of scrap wood to fill in the floors for both sides. I cut approximately 10-13 pcs. Approximately 2″14/32 and 2″ 1/4 in length.


On the left side facing where the chicken coop will be resting..leave an opening for your hens to access the nesting area.
We’re going to use some course netting to make our chicken wire. I only happen to have some white on hand. It is real easy to paint with acrylic paints to be grey.
 Just lay down some wax paper and dab the acrylic paint onto both sides of the netting and hang to dry.
Note to self…paint the base first. I didn’t do that and now I will have to paint around the netting/chicken wire.
Glue your door frames to the faux chicken wire by apply a line of glue just the inside back edge of the door frame. Line up the netting so that is is straight. Dry and trim off the excess.


Next we will mark off for the hardware for the doors and finish adding the netting/chickenwire so our little chickies don’t run away. I had fun doing some brass etching and will give a summery of what I did and provide the templates for the pieces. You can also just purchase your hardware and skip making your own.
Anyone have room for a kitty? See ya next week.


Just a note; I hope you are well. Take care of yourself.
LikeLike
We are well. Thank you! Hope all is well with you as well.
LikeLike