
I just love little bird cages and for the longest time have had a desire to make one. I just hate soldering. Soldering is not my friend. I have made progress on getting some things to solder some of the times. But I am not consistent every time. So….I had to think of a different way to get my little cage done. Paper, wire and glue are the main components.

Let’s have some fun.

Supplies:
- wire 30 gauge
- card stock
- form ( I used the glass from the bead landing cloches)
- Bottom portion from a small gumball machine container. This will be the bottom of the cage.
- earring backs for pierced ears. The bell shaped ones.
- some small filigree bead spacers
- paint
- glue white
- super glue
- tooth pick
- sand paper
- 3mm wide wood strip for spacing.
Cut a strip of the white card stock approximately 1/8 ” wide and one strip 1/4 ” wide. Use the 1/4″ strip to form a band along the bottom of the glass. Form two 1/8″ bands /rings. Placing one approximately 1/16″ above the bottom band and the other approximately 3/4″ above. Right before the glass starts to curve. Please note…do not glue the bands to the glass. Over lap the strips ends and only glue the paper to paper. 
Cut a 1/2 circle of card stock and use a ball stylus to round out. Use one very small dot of glue to hold to the top of the glass.

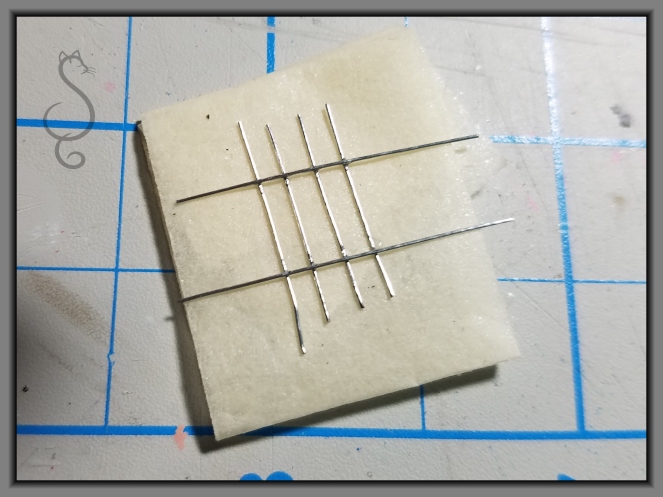
Cut 34 lengths of the 30 gauge wire approximately 2.5″ long. You may need more or less depending on your spacing. Apply glue only to the paper and align a wire running from top to the bottom.


Try and have the wire run straight as possible from the top to the bottom. Cut off any excess wire you have hanging over the edge. Mine is definitely crooked.
I used a piece of wood that is 3 mm in width to make a light mark for the next wire.

Glue your next piece of wire on the mark.

Keep the wires on the marks as close as possible. The spacing at the top the wires will be closer together. Continue on until you fill to the end.

Cut a 2 strips 1/8″, one 1/4″ and another 1/2″ circle. Glue over the first strips. Making a sandwich of the wires.
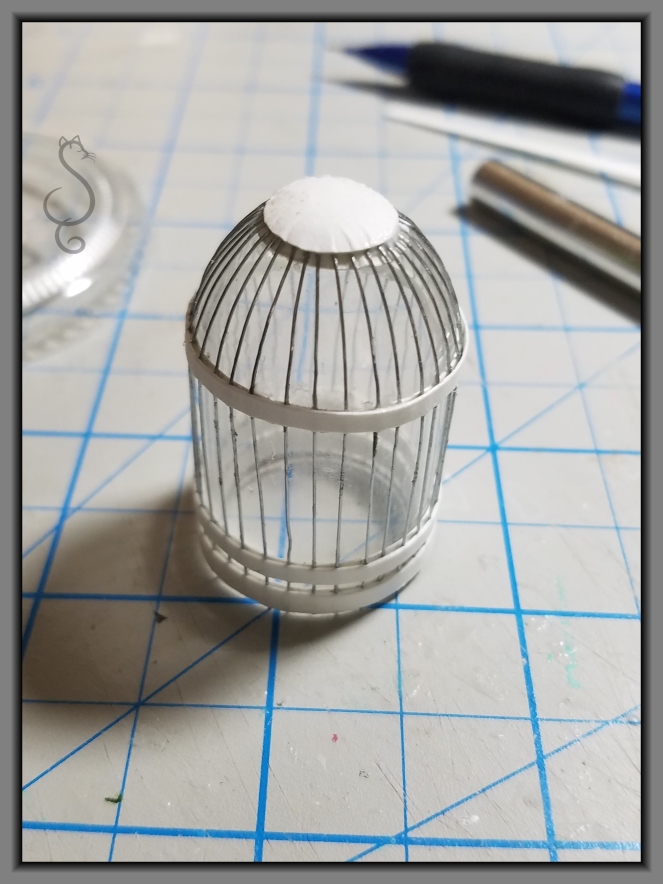
Let dry thoroughly. Gently work the rough cage off of the glass dome. 

Test fit the bottom of the bubble gum machine container.

Cut a 2.5″ piece of the 30 gauge wire and form a loop at one end.

Thread on an earring backing, small circle bead spacer and then pierce through the bottom of the circle through to the top circle.


This picture shows a test fit of the top filigree circles finished off with the earring back. I changed to a flat filigree vs the dome in my finished project as below.

Once you have your choice of top filigree spacers, make a round loop for the top.
Next we will work on the door for the cage. It will be a sliding door that slides up. Cut four wires right above the second band from the bottom and then cut again the same three wires about 1/3″ above. You will have a small rectangle opening.

Cut a piece of the 30 gauge wire to frame the opening and super glue (I use gorilla gel super glue) glue across the cut wires at the top. The picture above shows the wire in place painted white to see.
Cut four pieces of the 30 gauge wire approximately 1/2″ and two pieces 3/4″ long.
I used the back side of a piece of masking tape to hold the wires in place. Four across vertical and then two across horizontal. Be sure to use your spacing wood to space the bars for the gate so that they will match the cage. The door will need to be just a tad bit taller then the opening. Glue with the super glue.
I happened to find an interesting glue “helper” in the hobby store. The sales team member said it would work with the liquid super glue, however, I found that it works with the gel super glue just fine. It’s called Johnny weld. You are supposed to pour a little bit of the johnny weld sand on the connection and then add a drop of the liquid super glue. I , however, did it the opposite way on my cage door. I placed the gel super glue on the joins ( very sparingly) and then with a paper towel under to catch the extra johnny weld, I poured on top of the joins. The Johnny weld helps make a stronger bond.


Trim off the extra wire at the top and bottom. The above picture shows the johnny weld on the back of the cage door.
Trim off the side wire to extend 1/8″ over the last wire. Bend you door around the glass shape so that it will be rounded slightly.
Place the door over the opening. Making sure that the top wire of the cage door is above the door frame top wire. Bend over the wires at the sides in a “u” shape around the vertical wires. Not too tightly. The door will need to be able to slide up and down.

Sand down a tooth pick to about half the width.

Measure a width across the cage for the bird perch. Cut and notch the ends to fit between the wires.
Cut another piece of the toothpick about a 1/4″ wide. Use a t-pin to make holes in each end.


Cut a small piece of the 30 gauge wire and shape as above. I missed a picture. Trim the length to a little over 1/4″ bend the ends of the wire in toward the middle and trim off. Insert the legs into the ends of the wood. This is the swing that hangs from the loop on the inside of the cage. 
All done with the hard part. Now you can paint and decorate as you wish to finish up your bird cage. I recommend sealing the paper with a sealer before painting with acrylics to prevent warping. I spray painted flat white primer on my cage for my sealer.
You can make a simple stand by bending wire to form a hook.


I hope everyone had a lovely Easter holiday!
Tina


I knew I could count on you. You never disappoint. So pretty with the morning glories. Thank you and hope you had a peaceful Easter.
LikeLike
TY! 🙂 and yeah! the morning glories were recognized….little happy dance
LikeLike
This is genius! Congratulations!!!!
LikeLike
TY Lola! 🙂 Appreciate the comment. Sorry for the delay in responding.
LikeLike
Absolutely gorgeous, just so precious
LikeLike
TY
LikeLike
Just signed up and saw the tutorial on the bird cage, what a cleaver girl you are👍Thanks for sharing.
I am 74 and making two doll houses for my great grand children. Furniture is so expensive so this is doable sooo
Grateful for your generosity of sharing😇
LikeLike
Thank you! Thrilled to hear that my post will be helpful. I would be delighted to see your projects!
LikeLike
Lovely Birdcage. Will be trying to make it very soon.
LikeLike
Thank you! I would love to see your bird cage when you have made it!
LikeLike
I just found your site from Kris Compas’s. First thing tomorrow, I’m making the little bird cage and the lawn chairs. They are adorable! Thank you so much for doing these easy-to-understand tutorials – it brings me and my granddaughters so much pleasure to be able to make lovely little things for our dollhouse.
LikeLike
My pleasure Dayle….share a picture if you get a chance to…would love to see how they turn out. 🙂
LikeLike
Hi Tina! It appears that Great Minds think alike 😀
I posted a Very Similar tutorial to yours early last year which you might wish to see. It’s entitled “La Cage… Oh, Faux!” Mine cages are more Shabby and yours is much more Chic but the techniques are quite close.
Even so, I LOVE the look of your dainty bird cage and I may give the fine wire a try since the results look Very Pretty! ♡
But before I forget…. I learned a neat trick from another blogger which you might enjoy as well, that applying Super Glue and then a sprinkling of baking soda over top will make a really solid bond just as the Johnny Weld does. I been using this method for a while and it really works! 😀
Cheers
elizabeth
LikeLike
Hi Elizabeth! Oh my goodness, so close and yet different. 🙂 Thanks for the baking soda/ glue tip. I have tried it in flower making but not on wire to wire. It will be much more economical than the Johnny weld. Best Tina
LikeLike
Pretty cool!
LikeLike
Thank you! 🙂
LikeLike
Lovely bird cage. Thank you for sharing information and thanks to Elizabeth for Baking Soada tip
LikeLike
Thank you! 🙂
LikeLike
Thank you so much for sharing this tutorial. This is great!
LikeLiked by 1 person
TY for your kind words! 🙂
LikeLike
Your tutorials look great. I have been wanting to make a birdcage but was not sure how to begin; now you have provided great directions along with clear pictures. Thanks!
LikeLike
Thank you so much for commenting 💕
LikeLike